


Introduction
If you’re looking forward to creating an automated workflow to integrate your services, then an Azure Logic App will be the way to go. This blog deals with the process of developing such an app and will help you get started in no time at all.
Types of Business Events
In-built Business Events
Follow the steps by using this link to configure and verify alerts on the in-built business event
Customize Business Events
Create project for customized business events
Follow the steps specified in the link to create a customized business event for Vendor Creation
- Firstly, create a new Dynamics Project titled “Dev_BusinessEvents”
- Then, update model with Application Foundation titled “ApplicationSuite”
- Finally, add new class called “DevVendorCreatedBusinessEventContract”
/// <summary>
/// The data contract for the <c>VendorCreatedBusinessEvent</c>,business events.
/// </summary>
[DataContract]
public  class DevVendorCreatedBusinessEventContract extends BusinessEventsContract
{
    private VendAccount vendAccount;
    /// <summary>
    /// Initializes the field values.
    /// </summary>
    private void initialize(VendTable _vendTable)
    {
        vendAccount = _vendTable.AccountNum;
    }

    /// <summary>
    /// Creates a <c>VendorCreatedBusinessEventContract</c> from a <c>VendTable</c> record.
    /// </summary>
    /// <param name = "_VendTable">A <c>VendTable</c> record.</param>
    /// <returns>A <c>VendorCreatedBusinessEventContract</c>.</returns>
    public static DevVendorCreatedBusinessEventContract newFromVendTable(VendTable _vendTable)
    {
        var contract =  DevVendorCreatedBusinessEventContract::construct();
        contract.initialize(_vendTable);
        contract.parmVendAccount(_vendTable.AccountNum);
        return contract;
    }

    [DataMember('AccountNumber'), BusinessEventsDataMember("@Dev:AccountNumber")]
    public VendAccount parmVendAccount(VendAccount _vendAccount = vendAccount)
    {
        vendAccount = _vendAccount;
        return vendAccount;
    }

    private void new()
    {
    }

    public static DevVendorCreatedBusinessEventContract construct()
    {
        DevVendorCreatedBusinessEventContract retVal = new DevVendorCreatedBusinessEventContract();
        return retVal;
    }

}
- Add new class titled “DevVendorCreatedBusinessEvent“
[BusinessEvents(classStr(DevVendorCreatedBusinessEventContract),
"Dev:VendorCreatedEvent","Dev:VendorCreatedEventDescription",ModuleAxapta::Vendor)]
public final class DevVendorCreatedBusinessEvent extends BusinessEventsBase
{
    private VendTable vendTable;
         private VendTable parmVendTable(VendTable _vendTable = vendTable)
    {
        vendTable = _vendTable;
        return vendTable;
    }

    private void new()
    {
        super();
    }

    public static DevVendorCreatedBusinessEvent construct()
    {
        DevVendorCreatedBusinessEvent retVal = new DevVendorCreatedBusinessEvent();
        return retVal;
    }

    [Wrappable(true), Replaceable(true)]
    public BusinessEventsContract buildContract()
    {
        return DevVendorCreatedBusinessEventContract::newFromVendTable(vendTable);
    }

    static public DevVendorCreatedBusinessEvent newFromVendTable(VendTable _vendTable)
    {
        DevVendorCreatedBusinessEvent businessEvent =  DevVendorCreatedBusinessEvent::construct();
        businessEvent.parmVendTable(_vendTable);
        return businessEvent;
    }

}
- Create your trigger on “VendTable_onInserted”. Now, create new class as shown below for business events that will occur as “Vendor Created”
public static class DevVendorCreatedBusinessEventTrigger_Extension
{

    /// <summary>
    ///Send the business event on vendor record creation.
    /// </summary>
    /// <param name="sender">Vendor Table</param>
    /// <param name="e"></param>
    [DataEventHandler(tableStr(VendTable), DataEventType::Inserted)]
    public static void VendTable_onInserted(Common sender, DataEventArgs e)
    {

        VendTable vendTable = sender;
        DevVendorCreatedBusinessEvent businessEvent = DevVendorCreatedBusinessEvent::newFromVendTable(vendTable);
        if(businessEvent)
        {
            businessEvent.send();
        }
    }

}
Finally, you can now build the project
Activate customized Business Event
To create the customized business event, please follow the steps mentioned below:
System administration >> Setup >> Business Events >> Business Events Catalogue >> Manage >> Rebuild business event catalogue

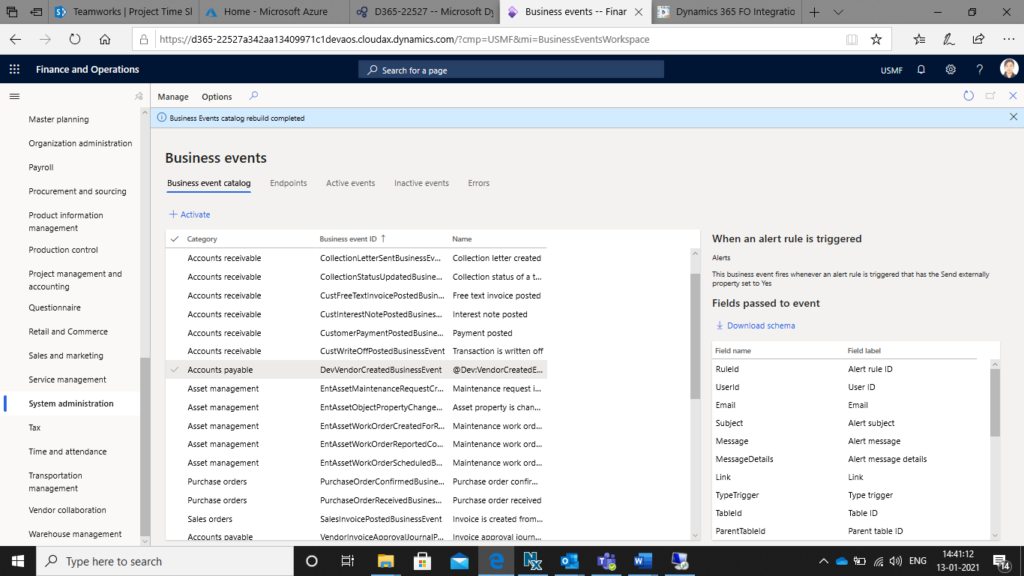
The created customized business event will be added in the business event lists as shown in the screen below:
Create logic App on Azure portal
Finally its time to generate the logic app. First login on https://portal.azure.com

To create logic app “VendorCreatedLogicApp”, follow the same steps specified in the link of inbuilt business event.
Your logic app design will look like the screen shown below:

Create new vendor in D365 FO and verify that alert mails are being received and you should be good to go.
Conclusion
By following the above steps as they are mentioned, you should have your Azure Logic App ready. Our DEV IT engineers have prepared this tutorial after getting several requests for it in comments of previous blogs. If you need any assistance in enterprise application, please feel free to request it in the comments bellow and we’ll be sure to help you out.